Integrate Ascend with your website for inventory uploads and order exports.
Ascend uploads a file to us every 2 hours from 8 am to 6 pm PST, in addition to your nightly upload. This upload only updates inventory information for items that are already mapped.
Looking for information on how to connect your Loyalty and Performance integrations? Find more information here.
Set Up in Admin
Read the general setup instructions
Set Up in Ascend
Inventory Upload
- Find the Tools menu, then click Options.
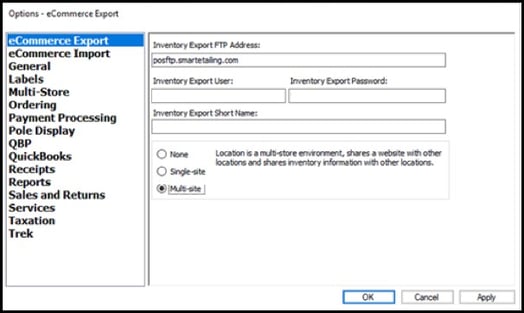
- Select eCommerce Export.
- In the Inventory Export FTP Address field, enter posftp.smartetailing.com
- In the Inventory Export User field, enter your FTP Account Username (this should be a 4-digit number)
- In the Inventory Export Password field, enter your FTP Account Password from the POS FTP email you received from us.
- In the Inventory Export Short Name field, enter the Neighborhood Descriptor for the location you are connecting. This can be found (and edited) by navigating to Settings > Website > Store information
The Inventory Export Short Name and Neighborhood Descriptor must be an exact match. This field is case-sensitive.

- Select the appropriate status for your location.
- None: Select this option if this location does not upload to an eCommerce website. Data from this location is not included in any manual OR automatic uploads.
- Single-Site: Select this option if this location is part of multi-store chain, but uploads to its own, individual eCommerce website.
-
Multi-Site: Select this option if this location is part of multi-store chain and all stores in the chain upload data to a single eCommerce website.
- Click OK and Apply to save changes.
- Repeat this process for every location if you the multi-site option is selected.
Order Export
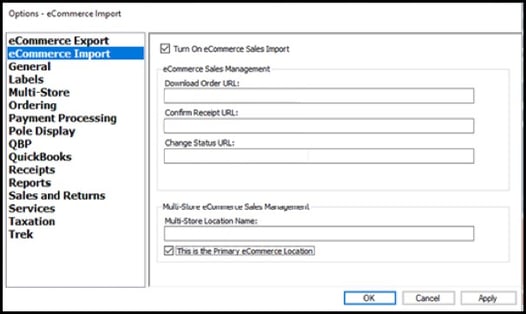
- From the Options window select "eCommerce Import".
- Check the box Turn On eCommerce Sales Import.
- Make sure API Version 2.0 is active in Settings > Commerce > Export Settings.
- Copy and paste the first URL into the first URL box, the second URL into the second box, and the fourth URL into the third box.
- Click Apply to save changes.
- To locate exported sales, Unlock the Ascend Desktop and/or add the "SmartEtailing" Tile to the desktop.
- Note: To keep the Ascend integration functioning smoothly we recommend generating new URLs in Admin and updating in Ascend semi-annually.

Exported orders appear as Layaways. You will have to convert them to sales.
Troubleshooting
MPNs and UPCs
- When adding items in Ascend, add the UPC/GTIN to the UPC field in Ascend.
- If a UPC is not available, add the MPN to Manufacturer's Part Number in Ascend.
Putting Items on Sale
- To get sale pricing to show up on your website, you must create a Sales Promotion in Ascend. Here's how to manage sales promotions.
- If an item is present in more than one active promotion, your site will use the sale price and dates from the promotion that was created earliest. We recommend having items appear in one active promotion at a time in your point of sale. Contact Ascend support if you require assistance modifying your POS Promotions.
Double Selling Products
- Process all online orders as soon as possible (within 15-30 minutes of receiving them) to ensure that when your next upload occurs, you don't reset inventory levels for sold items.
Read More on These Integrations from Ascend
