Connect Admin to your Stripe account to accept credit cards online and in-store via a card reader.
| Connect Stripe Account | Disputes/Chargebacks & Fraud |
| Add Location | FAQs |
| Add Card Reader | Troubleshooting |
| Payment Capture Options |
Connect Your Stripe Account
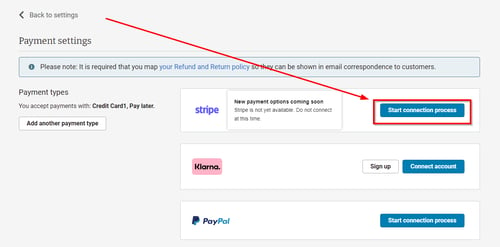
- In Admin, navigate to Settings > Commerce > Payment settings.
- In the Stripe box, click "Start connection process".

-
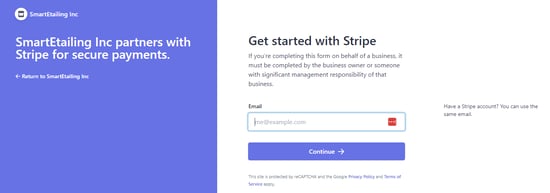
- This will take you to a separate screen where you must log into your Stripe account.

-
- If you haven't started setting up a Stripe account you can do this at this point, or finish the setup and verification if you're partway complete.
- Once logged in, select the Stripe account you'd like to connect to and click "Connect".
- You will then be directed back to the Payment settings screen, with Stripe connected.
- The final connection step is to toggle on Stripe in payment settings:
If you are migrating FROM WePay, you must toggle off WePay before you can toggle on Stripe.
Add Your Location
- This is only necessary if you are using Stripe for in-store transactions.
- Navigate to your Stripe dashboard by clicking "Account dashboard" under Stripe in payment settings, or by logging in at https://dashboard.stripe.com/login.
- At the top of the page Click "More", then click "Terminal".
- In the pop-up window, click "Get started".
- This will enable Readers in the Payments view.
- Scroll down to the Locations box and click "+ New" to add your location.
- Enter your location name and store address in the Create Location modal and click "Save".
For legal and tax purposes the address entered here must match your store's address.
Add Your Card Reader
This step is only applicable if you are using Stripe for in-store transactions. Please order the BBPOS WisePOS E terminal.
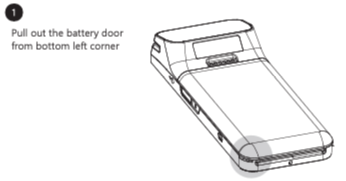
- Remove your card reader from the box and insert the battery.
 Select your language and Country.
- Connect to your Wi-Fi network.
- Wait for any updates to process.
- The screen will show three random words when completed, take note of those words.
- The reader uses the cord to charge it and does not need to be plugged in except for charging.
- Click on the location that you have just created and this will open the location details page.
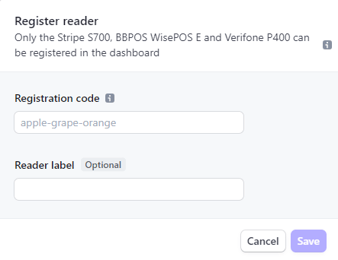
- In the Readers section, click "+ Register reader".

- Enter the three-word code displayed on your reader into the Registration code field.

-
- If there is no code on your reader's screen then you can generate one by going to Settings on the reader and clicking "Generate pairing Code."
- If desired enter a Reader label (Ex: Front Desk, Service, etc.).
- Once the registration code and reader label have been entered click "Save".
Payment Capture Options
Automatic Payment Capture
- If you select automatic payment capture, Stripe will automatically process payment for sales as soon as the order is placed.
- With automatic payment capture selected no additional steps are needed to capture funds.
Manual Payment Capture
- With manual capture mode enabled, you must take action on a payment authorization within 7 days to receive funds for the sale.
- It's recommended to capture payment before fulfilling products.
- When you are using manual capture and have pending authorizations, you will be alerted on login that you have pending authorizations.
- You can also find a report of pending authorizations in the notification bell.
- With manual capture mode enabled, you’ll have two choices on the Sale Details view: Capture Online Payment and Void Authorization.

- Clicking "Capture Online Payment" means that you will capture either all or less than the sale total.
- Once clicked, a dialogue box will open where you can choose to capture the full amount or less than the full amount.
- You will be charged fees on the captured amount.
- You can only capture once.
- If you choose to capture less than the total, there is no way for you to come back later and capture the rest.
- You will not be able to capture more than the sale total.
- Clicking "Void Authorization" means that you will void the authorization and no funds will be captured.
- This process is irreversible.
- You will not be charged fees on voided authorizations.
- To void an authorization, press the Void button and confirm your choice. (Your customer will receive email notification of the voided transaction).
Disputes/Chargebacks & Fraud
- A dispute (also known as a chargeback) occurs when a cardholder questions your payment with their card issuer.
- If a customer files a dispute against a payment made to you, Stripe will alert you via email notification and also in your Stripe Dashboard.
- Everything surrounding the dispute will be handled in your Stripe Dashboard, not in Workstand Admin.
- Here are some Stripe links regarding fraud and disputes/chargebacks that you may find helpful.
- Read our help center article about Limiting Fraud for more information.
FAQs
- How do I contact Stripe?
- Stripe support can be accessed by clicking Help in the top right hand menu of your Stripe dashboard. You can also chat, have Stripe call you, or email them from this page.
- Can I use an existing Stripe account?
- Yes, you can log in to your existing account in Workstand Admin to connect to the same account. A Stripe Express account will not connect. If you have an existing account of this type you will need to create a new account at dashboard.stripe.com in order to connect.
- When will I receive payouts?
- Typically, when you start processing live payments, Stripe schedules your initial payout for 7–14 days after you successfully receive your first payment. In some cases, the first payout might take longer depending on the country of operation or industry risk level. Subsequent payouts follow the schedule that you define in your account’s payout schedule.
- Is there a different rate on card-present (POS) vs. card-not-present (website) transactions?
- Yes, Stripe’s base rates are 2.7% + $0.05 per transaction in-store and 2.9% + $0.30 per transaction online.
- Our platform fees are flat and tied to your Workstand package level. See platform fees here.
- You may be able to negotiate with Stripe for a lower base rate.
- Can I refund a credit card payment from Sale Details?
- Not yet for in-store sales. The refund function on the "Refunds and exchanges" page is not yet connected to Stripe and cannot yet be used to refund an in-store sale.
- Refunds will need to be initiated and managed from your Stripe dashboard until this functionality is added.
- Yes for online orders. Click here for more information for Refunding a Website Order.
- Not yet for in-store sales. The refund function on the "Refunds and exchanges" page is not yet connected to Stripe and cannot yet be used to refund an in-store sale.
- If I need to do a refund for an in-store transaction does the consumer need to have their credit card present?
-
No, the Stripe terminal is not used during a refund.
-
The original transaction is securely linked to the original card and a refund will be applied automatically.
-
- Will debit cards be treated differently than credit cards?
- No, all transactions will have the same rate and fees.
-
Will Stripe allow test transactions, or for the owner/account holder to make transactions with a credit card to their own account?
- No, the Stripe Services Agreement prohibits testing in live mode using real payment method details.
-
Does Stripe onboarding allow us to set the Statement Descriptor that appears on a consumer's credit card statement?
-
Yes, set and update your statement descriptor in your Stripe dashboard: https://dashboard.stripe.com/settings/public
-
-
Does Stripe offer manual and automatic capture? What will the default be?
-
Yes, manual capture is off by default but may be enabled by checking the manual payment capture box in the Stripe payment method section in Admin > Settings > Payment Methods. Manual payment capture must be completed within 7 days.
-
-
Does Stripe Online accept Apple Pay and Google Pay?
-
Not yet, but our development team is working on this integration update.
-
Troubleshooting
- For suspected firewall card reader connection issues please read this Stripe article.
